Nov 28, 2013

Happy News!! :D

First of all, I really want to say HAPPY THANKSGIVING, to all of you who celebrate!! :D Thanksgiving is a sweet tradition, when one day you just remember how thankful you are for everything you have :)

And...
Are you ready for the happy news? :) :)

Days ago, maybe almost a week, I was asked to join Vicky and Susan's amazing team! :D :D we're gonna go live at early January. 
New beginning, new hope, and new challenge, eh? New challenge blog, called Open-Minded Crafting Fun Challenge Blog. You could pop at the blog and seeing around :) :) 

I'm so glad, and also thankful; remembering today is thanksgiving, lol. Joining their teamie really make me proud and honoured :) I can't even imagine, could be a team with lots of professional and talented ladies. I can't wait to start it with you all, ladies! :D

At least, don't forget to join our very first challenge! :D I'll wait you there!

xoxo, 

Mikha Adriani


Nov 22, 2013

Christmas Card; in Black and White, LOL!

Hi everybody!!
How are you all? :)

This late November really run faster for me :)
I have a lot of things to do and happened. Life changes, and things should be go on.
I'm moving to my hometown at the end of November. I have lived in Surabaya for 5 years, leaving things here makes me kinda sad. There are a lot of things happened, whether good or bad, but that's all make me who I am. 
Things come and go. Some stays, some leaves. Well, that's should a life be, eh?

Sooo, today I'm gonna share an unsual card; for more spesific Christmas Card.
Bet you've never seen any in black and white. LOL.
Here's the things, I have a lot of things on my "to try list" and so little time to explore.
My Magnolia Winter Wonderland is just arrived, and in the other hand I can't wait to play with them!! They are way too cute.

So, I decided to pick this cute The Day Before Christmas Stocking Tilda; yes this one got quite long name LOL. I'm kinda missing Magnolia after quite some times using digis.
Days ago, I saw Samantha's creation with this chalk effect; decided instantly that I should try this amazing technique. I personally like it :)
Before made it to card, my friend and I practice and share the result :) she also made one with chalk effect. 

Anyway, here's my card:

Here's the detail for the chalk effect.
Somehow Tilda looks quite scary. LOL!
I stamped her with Versa Mark then emboss her using white embossing powder.
Also added white gesso around her :)

For the embelishments, I added white flowers plus a pin. Lately I addicted to pins! They're just gorgeous, simply fit everywhere :D 

Half pearls and doily are a must on my cards :)
I also added snowflakes that are punched from MS Punch. 

There's more!!
I made my own washi tape!! :D :D

It's so simple and super easy to make.
All you need is just a paper tape. Then I stamped "Merry Christmas" word.
Tadaaa, my very own washi tape is born! LOL.
I added liquid pearl too there :)

I'd love to enter this card for:
Dutch Magnolia Lover #68 - Light it to make it cozy in the dark; personally think that white in the black would make it cozy. LOL!

That's all for today.
I'm quite tired but eager to talk alot today. LOL.
Hope you patient enough to read all of this.
Wishing you all an amazing day! :D

xoxo,

Mikha Adriani


CC&CC #53 - Give Thanks

Hi everybody! :)
It's time for the new challenge at CC&CC, with Give Thanks theme :)
This time, we're sponsored by Stamp Fairy. They have plenty of gorgeous digis!

And here's my card:
I choose to go with a girly colour here, PINK! :D

Here's my colouring detail:
Coloured this cutie with Copics.

Here's the details:
I put dark pink plain paper with texture in the middle of the paper. 
Then added pink lace in up and bottom.
Decorated it with flowers, pearl chain, pearls, and butterfly. 

I also stamped "Thank You" word using BO Bunny Stamp.
Also added cute bunny there. I looove that bunny! The only bunny left in my local store.
Quickly I brought it into cashier and paid it. LOL.
Now it hang cutely on my card :) 

I added pink ribbon and half heart pearl in the top of the image.
Stamped corner swirl stamp on the upper right. 

Here's the last preview of my card.
Hope you enjoy it :)
Don't forget to visit the other DT's blog to see the details of their creations :)
They're sooo wonderful.

Would like to enter this card for:

That's all for today :D
Wish you all an amazing day :D

xoxo,

Mikha Adriani

Nov 8, 2013

CC&CC #52 - Monochromatic

Sooo, a few weeks ago, I was asked by Joanne to join her teamie :)
That makes me officially part of Chocolate, Coffee and Cards Challenge!! :D
Yayy! So excited :) :)

Our theme this time is Monochromatic :) and our wonderful sponsor is Robyn Fetish.


Here's my card:
And I created this blue christmas card using wonderful "Bella da Snowlady"
Have blue as monochromatic scheme here :D

Here's my colouring detail. Coloured her used copics.

I added christmas sentiment I got from a paper, forgot the brand.
Then put some flowers in the middle of sentiment and image.
I also put two corners to frame the sentiment.
I distressed all the paper edge, then inked them with blue ink :)

Hope to see you at CC&CC :) :)

Entered this card for:


Thanks for stoping by :)
Really appreciate if you leave any comment :)

Hugs,

Mikha Adriani

Nov 7, 2013

Pink Christmas Card - With My Besties :)

Hi everybody!! :D How was your day? 


Mine? Today is a really-really long day for me. Idk why, today run really slow. 
Maybe it's because I just want to go home soon and get some sleep. LOL.
I stayed up late until around 1 a.m. yesterday to finish this card.
I really really have no time for myself lately. Ugh, moving is so tired and consumed much energy. 24 hours in a day really isn't enough.

Enough for the mourn, haha.

Anyway, here's my card:

Pssttt, I took the photo with my lightbox. 
That's related to the 2nd DDCC! Check the curent challenge here. You could win 20$ cash to spend in any store you like :) Interesting, eh? :)
Btw, you could also found my lightbox tutorial here. That was my first tutorial; ever. LOL.


There's a Pink or Silver Christmas Challenge on My Besties.
I decided to go with pink, with a little bit silver on the glitter and snow. I can't stand not to colour the christmas tree green.
LOL.

Here's my colouring detail.
Coloured this cutie with my favourite medium, Copic! :D
I added some embossing powder on the image, to create snow look :) in white and silver.

Here's the flowers detail.
I had those big pink rose a long time ago, bought it for it's so cute, but haven't used it until now because of the size. My other flowers are medium small. This one too big for them.

Days ago, my lovely sister, Amelia, brought me a surprise. She gave me lots of paper flowes!! 
Two of them are the pink and white beside that big rose. That really complete the combination :)
Thanks a bunch, sist. You really made my day xxx

I added two tickets, stamped from latest BO Bunny Christmas Stamp.
And I also added bow, pink flower and silver note charm.
See that white and pink pin? That cute things also came from Amelia's package!! :D

In the upper left, I added pearls, snowflakes, and also corners from clay. It's been my favourite lately; I mean corners.
Pink little flower above the corner also on Amelia's package. LOL.
This card is full of her things! :D

And there's 2 of something challenge at My Besties UK. Here's my list:
2 Snowflakes
2 Corners Clay
2 Flowers above the corners clay
2 pins
2 layers of bow
2 tickets
and
2 Different pearls size, LOL; does that count? :)


Would like to enter this card for:


That's all for today! :D
Thanks for stopping by and reading this post :)
I hope you have an amazing day!! :D :D


xoxo,


Mikha Adriani


Nov 1, 2013

DDCC 2nd Challenge - Create a Lightbox

Hi everybody! :D I hope you're all have a good day :D :D

Here's my post for today :D
Have you checked DDCC blog today? Yes, our 2nd challenge is going live! :D
And guess what the prize is? $20 cash prize for you to spend in any store you like! :D isn't that amazing? :) Don't hesiate to check.
And join our Facebook page here :)

Curious what's this about? 2nd challenge is challenging you about creating a lightbox.
I've been doing some research, herehere, and here :)

Maybe some of you wondering what light box is? :) Light box is a small box, created to help you take a better picture of your product or creation :D it'll create an clean background for your creation, make less distraction for your creation. That a definition from my self, lol.

And the result is this: 


This is how I make the lightbox:

Step 1:
Prepare all the ingredients:
Unused box I found in my office, LOL
Scissors,
Cutter,
Pencil,
Glue,
White Paper,
Ruler
Ah, I forgot to put the tape on the picture.

All of them are easy to find in your house, eh? :) :) 

Step 2:
Mark line about 1" each side, then cut it until it makes the shape below.
My english is poor, I hope the picture explains everything.
I only cut it in 3 side, for the bottom side won't deliver any light.

Step 3:
Put them together, like the third picture. I used tape to get them together :) 

Step 4:
The last, put white papers to cover the box, and your light box is ready to use!! 

This is the result of the light box!!
I did no editing this time :)

The left one is taken with lightbox, with no light. I take it inside.
The second one, the one in the middle is taken without lightbox, in my bedroom.
The last one is taken with lightbox plus lighting with my table lamp from above.

Which one do you like?
I love the last one, taken with lightbox. The only problem is my lighting. I only got one table lamp in my house. If only you added from three other side, the result would be awesome! :D :D

How about trying this outside? :) I will do that later and post the result in my blog asap. I got too much things happened lately :( My parents will move to another city soon, this November, in a few days. We have much things to be packed. And so am I, gonna move to another city on late 2013. I hope everything will be fine. :) :)

I hope you enjoy this post, and join us at 2nd DDCC. Can't wait to see you there :) :)
And also, don't forget to see my DT sisters' blog. They created an amaaazing project! :D :D

Andd, the detail about this card? Do you want to see it? :) :)

There it goes:

This is the colouring detail. I coloured this cutie whimsy stamp called Sweet Sparkle with Copics. I couloured her in pink and purple.
I got many coloured images, just hadn't had the time to create any card :(

Here's the left detail:

I added some pink and purple flowers, pearl chain around the image, and also magnolia dies.

Here's the detail for upper right side. I added three pink pearls, flowers and corner from clay.
You could see that I added white laces, around the square I used behind the image. 

Here's the detail for the right bottom:
Added pink and white ribbon, plus a charm :)
Didn't forget to swap some gesso here and there to create vintage look :D

Vintage yet cute :)
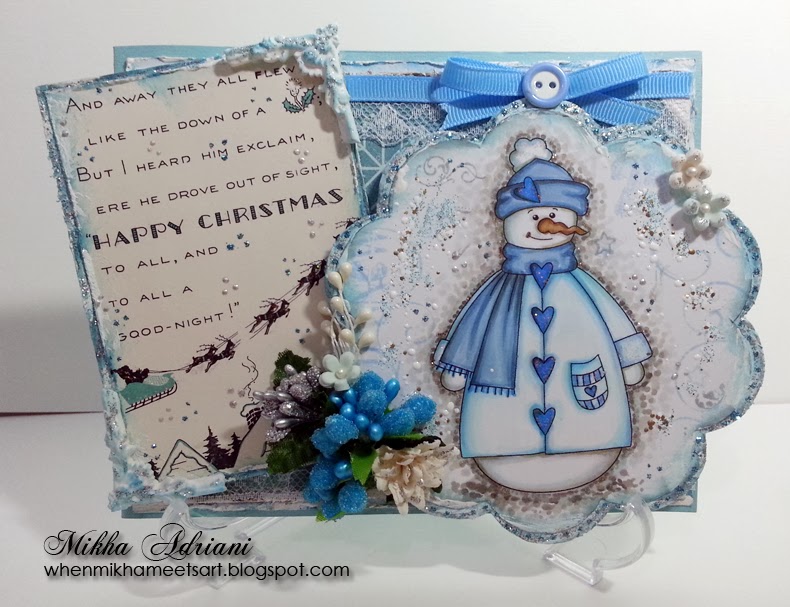
Here's the picture of the card, taken inside the lightbox I just created and lighting from above.
I edited this a little :)

Do you like it?
Plan to create a lightbox? :) It's very useful! :D :D

Would like to enter this card for:


xoxo,

Mikha Adriani